How To Migrate a Website Without SEO Negative Impact?
Even if it works well, there comes a time when website migration must take place. The reasons can be many and varied – another hosting company offers better conditions, they hacked you, you changed your company name. It is also possible that your company has evolved, the look of the site is already outdated or your view of it has changed, the requirements for the functionality of your site have changed and many more.
The time has come. Now, unless you decide it’s time to move the site to the Great Celestial Server (or to a designated basement in Alexandria), doing a single site migration requires some work, especially if you want to keep the site’s maximum network footage. . Exactly what it will be depends on what kind of migration you want to do.
Before you start any migration
First, we strongly recommend that you make a complete backup of your site – a complete file archive and database archive. Also download it on a local machine if you have the opportunity.
Separately display your main configuration files for further reference. Scan your site for the available towers, go through Google Search Console to store data, rankings and links. Pay special attention to the sitemap.xml file (s). If you have the opportunity, do one SEO analytics to identify any weaknesses in its optimization that could be remedied in a single migration.
Once you’ve protected yourself from losing your site, you can now move on to the migration itself. How exactly it will take place depends on what kind of migration you want to perform.
Migration to a new hosting
You have decided to change your hosting for some reason. Such a migration usually consists of two parts – transferring the site itself and transferring the link to it. Most hosting companies have a service through which they themselves can transfer your site at a decent price. If you are unsure of your skills, we recommend using them. If you want to do the transfer manually, these are the basic steps that are taken.
You have found a new hosting company, you have registered, you have created an environment. Most hosts support CPanel, which is relatively easy to handle. If registering and setting up a host requires a transfer of the domain, or at least the NS records to the new location, do so. In this case, there may be times when the site may be unavailable for the duration of the transfer.
Otherwise, wait to redirect your records or transfer the domain after the files are established. So when DNS servers change their records, the new ones will point to your newly installed site and the transfer may not be felt (if done correctly).
Database
First, you need to upload your database (whether it is mysql or postgers) to avoid any configuration issues (especially if your site’s system is more sensitive).
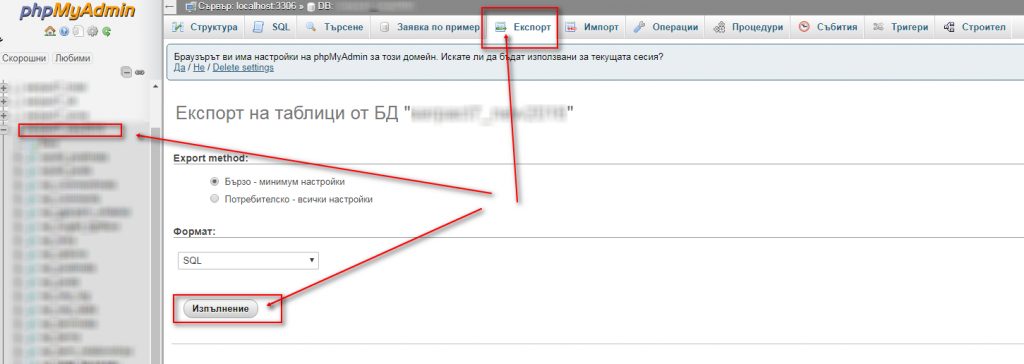
Create a database and user to it (agree rights). If possible, try to match those used on your previous hosting. If not, it’s not a big deal. Just note the differences. Then log in to the appropriate tool to handle this type of database (phpMyAdmin or phpPgAmdin), select the database you created, and import it .sql file containing your database that you downloaded earlier.
Uploading files
Once you’ve uploaded your database, you need to transfer the files to your site to their new location. If this is the primary domain as a user, then it is most likely the / public_html folder. If not, the exact location will depend on how you set up (or plan to insist) your addon domain.
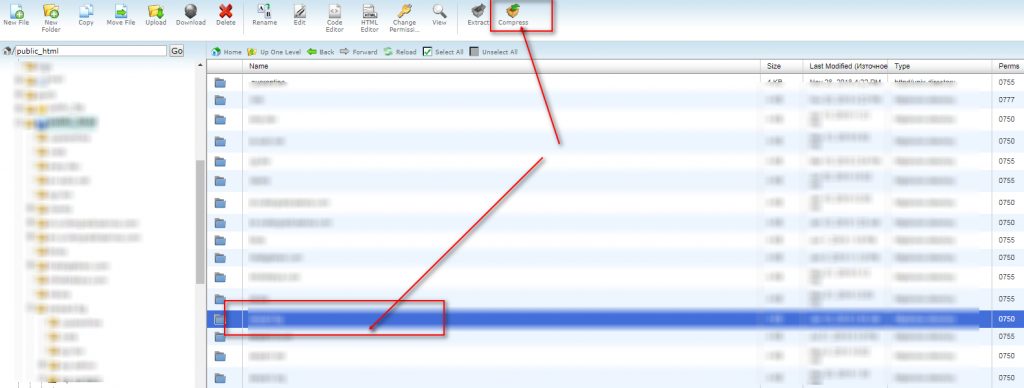
Once you’ve determined where your files should go, you should upload them. There are a number of ways to do this, usually using an FTP client for this purpose. Depending on how you have saved the files, you may need to extract them. When you are done you should edit your configuration files.
For WordPress, this is basically the wp-config.php file in your root directory. If you were able to create the database and the user so that they match the previous ones, do not touch them. Otherwise, make changes to
define ('DB_NAME', '');
define ('DB_USER', '');
define ('DB_PASSWORD', '');
If you use a different system, the file and commands may be different, but the principle will be the same.
Useful: If your site uses WordPress and you want to save yourself all these headaches, you can use the All-in-One WP Migration plugin.
First, on your old site, you export your site to a file. This will create an archive of the entire site and its database. In your new hosting’s CPanel, you create a new WordPress installation on the same domain, making sure that its address is the same.
After logging in to this site, you reinstall the same plugin and import the site from the above file. This will upload the database and its files and take care of their configurations. However, if you have files that have been uploaded in a non-standard way, you will still need to manually transfer them.
Once you’ve uploaded your files and data and linked them, your site is ready to be released from your new home. If your site has an SSL certificate installed on the old hosting, transfer it or reinstall it to the new location. Make sure you copy your htaccess and robots.txt files.
If you have not yet transferred your NS records (or your domain), now is the time to do so.
If you have successfully coped with the above instructions, after the migration, your site will be transferred to your new hosting, retaining its old url structure. This way, you retain the SEO results obtained so far, both search engine related and social networked ones.
Migration to a new domain
Domain check before any action
Before you start migrating to a new name for your site, it is a good idea to check the domain to which you will want to transfer your site whether it was previously used and if so how, what it ranked for, and what authority it had the domain. There are various tools with which to perform such a check, SemRush is perfect for this purpose.
If the domain is clean / has not been used so far, it will have no SEO implications. In most cases, when a website owner decides to change the name of their site, he or she seeks one because he or she only wants to be identified by that brand or that name. However, it may be that the name of the new domain was previously used by another company, even in another part of the world, and that domain has accumulated some history.
Before deciding to transfer to one such domain, check it carefully and determine its metrics, check how it ranked, what keywords, from which sites and what links it has, what anchor texts point to it, via Ahrefs. If these keywords, websites and links are thematically related to the site you want to migrate to that name, it can bring you SEO benefits. However, if they are not, and especially if there are cumulative links from sites with poor credibility, it can seriously hurt your rankings for a very long time.
After the migration of a new domain – there will be a drop in positions!
Another thing to keep in mind when preparing to migrate to a new domain is that such an action will necessarily have a negative effect on your ranking, albeit temporarily. As Google and other search engines notice the change, update their data and adapt to the changes, you will notice a significant decline in your results as well as the traffic generated to your site. This is temporary, normal, and happens every time such a change is made. However, if such a change is made, the recovery time and the decline rate can be significantly reduced.
Of course, you may decide to move your site to a domain, such as a test site, new design or functionality, and you do not want to disrupt your site or impair SEO. Then the new domain (or subdomain) will necessarily have to be blocked from being indexed or crawled by the robots. A convenient way to do this is to add
User-agent: *
Disallow: /
in the robots.txt file in its main directory as well as the noindex, nofollow tag in the head part of its code.
Migration to a new domain in a few steps
Before you begin such a migration, make sure you have a complete backup of your site, as we described in the beginning. You will then have to decide how to do the migration in question. There are basically two ways – one is easier, the other is more secure.
The difference is basically whether you want (and can) keep the files and database on your site in the same place. This can only be achieved if your old and new domains are hosted in the same location and if you use CPanel in the same account (ie you can make your domain settings so that they use the same folder) . That would be the easier way. You will then need to make the necessary changes to the files and database of your current site.
If you do not have this option, or if you simply decide to protect yourself against potential problems (which we consider advisable), then your new domain will be located somewhere else and you will need to migrate your files and database there. If you have ensured that your new domain is registered on the same hosting account, then create a new addon domain for it and give it a primary destination folder other than your old domain (for example / public-html / domain-new /). Then copy the contents of the folder containing your current site (along with all sub folders and their files) into the folder in question.
Working with hosting provider tools
Using phpMyAdmin or its corresponding phpPgAdmin variant, make a copy of your current database with a new name. If you want to use the same DB user for the new domain, you must set the privileges of the new database for that domain. If not, create a new user and give him / her the rights to that user. Edit the configuration files of the copied installation to use the new database. With WordPress this is wp-config.php. Edit the fields.
define ('DB_NAME', '');
define ('DB_USER', '');
define ('DB_PASSWORD', '');
When you find these fields
define ('WP_HOME', 'http: // domain-old');
define ('WP_SITEURL', 'http: // domain-old');
edit them to reflect the new domain.
If the new site is not on the same hosting account – then you are migrating your files and database as we described in the migration to new hosting.
Once your files have been uploaded to the new domain folder and the database is linked to them, you should make the corrections to the files in the new domain. This means crawling your database and replacing any instance that has “http: // domain-old” with “http: // domain-new”. These, of course, are exemplary names, replaced by the names of your old and new domains, respectively. Also http may need to be replaced with https if your sites have (and / or will have) an SSL certificate installed. The same should be done with all files – to check who and where they have the old domain and replace it with the new one.
If you use WordPress and have access to phpMyAdmin or access to the console then the corresponding SQL commands will perform the main replacement:
UPDATE wp_options SET option_value = replace (option_value, 'http: // domain-old', 'http: // domain-new') WHERE option_name = 'home' OR option_name = 'siteurl';
UPDATE wp_posts SET guid = replace (guid, 'http: // domain-old', 'http: // domain-new');
UPDATE wp_posts SET post_content = replace (post_content, 'http: // domain-old', 'http: // domain-new');
UPDATE wp_postmeta SET meta_value = replace (meta_value, 'http: // domain-old', 'http: // domain-new');
WordPress Website Migration with Plugin
Another way is to use a plugin like WP Migrate Pro to migrate your database if you don’t feel comfortable editing it manually.
Or, as with migration to new hosting, you can simply do a clean installation of WordPress on the new domain and use the EXPORT / IMPORT feature of All-in-One WP Migration to migrate your entire site with databases, content and files, saving most of your work, described above. The plugin will automatically reflect the differences in domain names where it finds them in the database. Static files will need to be manually edited. After making the changes, your site should now open at its new address.
Once your site has been moved to the new location, look at the robots.txt and .htaccess system files in its main folder. You will also need to change the domain name in each location where the old name appears.
In such a migration, it is important to maintain the URL structure of the site with an appropriate 301 redirects. Properly done redirects will ensure that the links (internal and external) to your old site are retained and that its visitors are taken to the correct location of the new one so that it does not lead to their loss and to search engine rankings.
The way to do this is to add a similar code or variant of it:
RewriteEngine On
RewriteCond% {HTTP_HOST} ^ domain-old.com $ [OR]
RewriteCond% {HTTP_HOST} ^ www.domain-old.com $
RewriteRule (. *) $ Http://domain-new.com/$1 [R = 301, L]
in your htaccess files. Minimal changes will be required if, for example, your new domain has SSL installed, or if you want the new domain to be served with www.
Google Search Console and site migrations
Once your redirects are ready, it’s time to let Google know about the changes. This is done through the Google Search Console. Once you have successfully accessed it, select your site and look in the left menu of Change of Address under Configuration. There, under “Adding and verifying your new site to Webmaster Tools”, you need to enter your new address and verify it to let Google know that you have transferred to a new domain, and it should take the necessary steps to maintain your ranking. as far as he can.
Then you should reflect the relocation and individual profiles of your site on social networks, if you use the API in its links you will also need a new Google Analytics code. This is followed by a prolonged and often fun period of testing, eliminating bugs and emotions that accompany them.
Migration to a new design
If a site lasts long enough on the web, the time comes when its owner looks at it and decides that its vision is already outdated or that its site needs to be redesigned to be able to perform additional or different functions. It is decided that a New Website is needed. However, here comes the delicate moment that a New Website usually also leads to a new SEO – there is a serious risk of losing almost all the SEO benefits that your old site has accumulated throughout its history. To avoid this, there are some actions that can be taken.
New design or upgrade over the old one?
First, once such a change has been made, it is necessary to decide how exactly the new design will be made. The question is whether you want the new site to be created from scratch or whether the core of the old site will be retained and the necessary changes will be made on its basis. This question often also depends on whether the system on which your old site was developed is not a good idea to change to another one that is more flexible or more specialized to reflect the needs of the site and its users. Now it has to be decided whether and to what extent the content of your old site will be preserved and what will become of it.
From an SEO perspective, any page that has accumulated a positive story is a good place to preserve, or at least to retain, its URL. This applies to every element of a site that has been indexed. The ranking of a site depends on the ranking of all the elements that make it up, and if some of those elements disappear, the weight they have accumulated and place on your site will also disappear. To minimize the impact of this factor, it is recommended that such a migration be preserved to the maximum extent by the URL structure of the site. The parts that you decide you do not need should be redirected to redirect 301 addresses that take on their function, taking into account the content of their content.
Therefore, before such a migration takes place, the old site must be carefully handled, its address structure, links and resources indexed to it (images, video files, documents) recorded.
If you have made the decision to save as much as possible from your site, you should migrate a copy of it to new processing hosting (non-indexing). If you decide to save perhaps only the most important part of the URL structure, parts of the content, or certain resources, then only transfer them. Or you can start from scratch if you want to get started or for any reason – losing your site, losing access to hosting, eccentricity of developers …
Well, it’s been a while, you have a new site running on some test server and you are satisfied with the result. Time to put it into action. Before starting the migration itself, certain actions need to be taken in order for it to go as smoothly as possible and to minimize its impact on SEO optimization of the site.
On the new site, download the address structure – either through the sitemap or through other tools, regardless.
Then compare it to your old site and note the differences. If you took to save as much of it as possible before working on it and worked on a copy of it, it will more or less match. If not, it will only match the part you have decided to save.
After comparing the URLs of your sites, note their matches and differences. It is advisable from an SEO point of view to change your new site addresses to match those of the old one where possible. On the other hand, if the old page addresses are not USER FRIENDLY or simply do not exist on the new site, then we would recommend that you create a table that reflects their closest matches (e.g., a blog post from five years ago you decided not to be migrated then their compliance would be later posts on the topic or just a blog page).
Once you have this list compiled, you should create and enter the necessary redirects in the htaccess file of your new site before you begin the migration. A simple example of one such redirect:
Redirect 301 / oldpage / http://site.com/newpage/
The idea is to have as few pages as possible that are not covered by the redirects. There are two things you can do. First, after moving the site, any link to the old pages, through search engines or other sites, will be quickly and smoothly transferred to the new pages and thus you will not lose traffic. Second, Google doesn’t have to wait very long before deleting pages that return a 404 error code from its index. It doesn’t matter to him how many links there are to those pages and what her rating is.
When the redirect is done so, the bot receives a message that the page has been permanently moved to a new place, and accordingly the search engine will re-index the link to the new link and transfer its ranking to the new page (usually), provided, of course, the content of the old page (more or less ) has been saved and there are no new On-Page errors on it.
The reason we advise you to save as much as possible from the original URL structure is to have as few individual redirects as possible. Each such redirect increases the size of the htaccess file, which makes it difficult for the bots to re-index the site accordingly. Each page that retains its old address is a page that does not need to be redirected, re-indexed, and moreover, the lack of redirects reduces the size of redirect chain that can be obtained for individual pages.
Once you have the htaccess file edited, you can proceed to the migration itself. It can safely be done as described in “Migrating to a New Domain”. The reason is that unless your site is built on a test server with a developer-only DNS that describes its domain, it will have a domain name different from the site name it needs to replace.
If it is indeed installed on such a server, then the migration will be done by the method described in “migrated to new hosting”. The difference here, however, is that there will be no need to adjust NS records. Of course, if this is the case, then you probably already know everything described here and you can even argue about it (please save the spoiled tomatoes).
With this migration to a new design, the extra actions once the site is online are fortunately a little. Once you save your domain, no additional action will be needed in Google Search Console. It would be a good idea to crawl the list of sitelinks and perhaps edit them on the sites from which you receive them. If you cannot, or do not want, the redacts in the htaccess file will perform the necessary redirects automatically and preserve as far as possible the effect of these links.